A favicon is a small image which appears appear next to your blog title in the browser tab. Favicons are also called shortcut icons. Favivon represents a brand or website. They help establish identity to your blog and are super easy to add. In this post we will see how to add a favicon to your website.
Before you can add a favicon to your website, you need to create or design the favicon, which is basically an image with .ico format. But other file formats such as PNG are also accepted in most platforms nowadays.
How to create a favicon?
As stated above, favicon is basically an image but with .ico file format. You can use your existing website or brand logo to create the favicon or you can design a fresh one.
What should be the size of favicon?
The most common favicon size is 16×16 pixels. But depending on where it is going to be displayed and which platform, the favicon size may vary. For example: WordPress will ask you to upload a site icon of 512 x 512 pixels. But for most cases, a 16 x 16 pixels will do.
- Browser favicon – 16×16 pixels
- Taskbar shortcut icon – 32×32 pixels
- Desktop shortcut icon – 96×96 pixels
- WordPress site icon– 512×512 pixels
Now, you can create the favicon in any image editor or using some online services also. We will cover how to create favicon in Adobe Photoshop and some online services.
How to create a favicon in Adobe Photoshop?
- Open Adobe Photoshop > Click on File > New > Custom Preset
- Since favicons are usually small, you can set the dimensions to 32×32 pixels or 16×16 pixels.
- Set background transparent.
- Design Your Favicon, or
- If you want to create the favicon from your brand or website logo, then you can also drag and drop the logo on the new design, and resize it to the dimensions.
- Finally save as .ico file.
You can also refer to this previous post – How to create or save favicon or icons using Photoshop?- which explains step by step how to create a favicon in Adobe Photoshop. Or you can also watch the tutorial video below.
How to create a favicon online ?
There are lots of online favicon generators which you can also use to create your favicon. Just search Google for “online favicon generator” and you will find quite many.
My favorite is https://favicon.io
Here you can create favicon from PNG image, text or emoji. The process is super easy and not necessary to explain. Just let the tool do the work and you save the favicon file generated.
Once you have the favicon file created, you can now add the favicon to your website. Favicons are generally uploaded to the root directory of the website. But the process to add favicon to your website varies depending on the type of website. So we are going to cover how to add favicon to Blogger/Blogspot, WordPress and a regular HTML website.
How to add a favicon to your website – Blogger/Blogspot
You can add a favicon to your Blogger / Blogspot website right from the Blogger settings.
To add a favicon to your Blogger / Blogspot website, follow the steps below.
- Login to Blogger, and from the dashboard, click on Settings tab on the left.
- Under the BASIC section, you will find FAVICON link. Click on it.
- A new window will pop up. Click on BROWSE > Select the Favicon > Click Save.
Note: You need to use a square image that’s less than 100KB. If you have a 16×16 pixel favicon file, that should do. - Visit your Blogger website and if everything is alright, you should be able to see Favicon in the browser tab, next to your page title.

How to add a favicon to your website – WordPress
You can add a favicon in WordPress website right from the WordPress dashboard.
To add a favicon to your WordPress website, follow the steps below.
- Login to your WordPress Dashboard
- Navigate to Appearance tab on the left and from the drop-down menu, click on the customize button
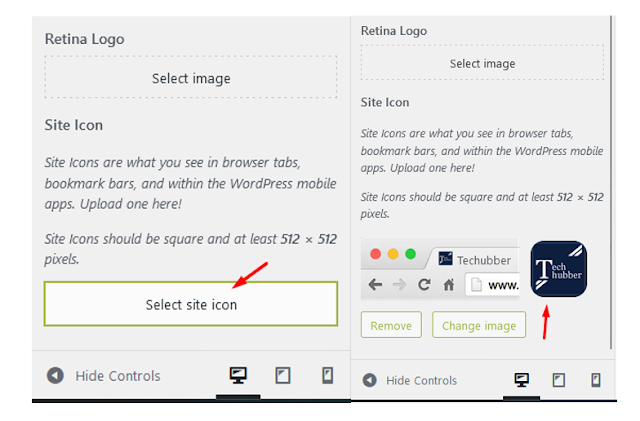
- The WordPress Customizer will open up. Click on the Site Identity tab, and in the Site Icon section, upload your favicon by clicking the ‘Select Site Icon’ button.
- WordPress asks for 512 x 512 pixels for the favicon or site icon. Make sure you have the favicon created with the appropriate size.
- In WordPress, you can simply resize your brand or website logo to 512 x 512 pixel using some image editor and saved as PNG file also. No need of a .ICO file. The image also need not be strictly 512 x 512 pixels.

- After adding the favicon or site icon, click on the blue Publish button in the top right corner to save the changes.
- Visit your website and if everything is alright, you should be able to see Favicon in the browser tab, next to your page title.
How to add a favicon to your website – HTML Website/Others
If you want to add a favicon to your HTML website, then you can simply upload the favicon file to the root of your website directory. Most browsers automatically detect favicon.png and favicon.ico file located in your website root directory as your website’s icon. So, you will not need to do any additional thing.
- Create the favicon file.
Tip: It should be square image preferably 16×16 pixel or 24 x 24 pixel. The image can be in .png or .ico format. - Favicon are generally an icon, so it is generally in .ico format.
Tip: If you have a PNG file, you can easily convert your image to .ico format using ConvertICo.com and save it to your computer. - Rename the .png or .ico image to favicon – important. Eg. favicon.ico or favicon.png
- Login to your web hosting and open the file manager. Then navigate to public_html / httpdocs folder.
- Upload the favicon.png or favicon.ico file into your public_html / httpdocs folder.
- Reload your website, and you should be able to see Favicon in the browser tab, next to your page title.
As stated above, if your favicon is favicon.PNG or favicon.ICO, and uploaded to the root of your website directory, then it should be detected.
If your favicon file is not in .PNG or .ICO file format, you need to specify in the head of the web page HTML.
To add a favicon to your website, either save your favicon image to the root directory of your web server, or create a folder in the root directory and name it “images”. Upload your favicon image in this folder.
- Add the <link> element to your index.html file right below the <title> element. Your code should look be like this:
<head>
<title>My Website </title>
<link rel=”icon” type=”image/x-icon” href=”/images/favicon.ico”>
</head>
So, if you want to add a favicon to your website, this should do. As stated, depending on the website platform, the approach is different. But what is common is to create a favicon icon which is square in dimensions and of appropriate size.
# How to add a favicon to website?
# How to create a favicon?
# What should be the size of favicon?
# How to create a favicon in Adobe Photoshop?
# How to create a favicon using online
# How to add a favicon to your website – Blogger/Blogspot
# How to add a favicon to your website – WordPress
# How to add a favicon to your website – HTML Website/Others?


